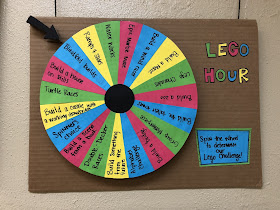
For the new school year, our LEGO Hour program got revamped.
These past few months, instead of challenges, we've been having Free Build days where kids come in and build whatever their hearts desire. You can imagine, after a while that gets old.
To add a new interactive element to the program, I designed a Lego wheel to determine our monthly challenges. Listed on the wheel are 19 different themes. One lucky attendee gets to spin the wheel each month to see what our challenges are (usually whoever has a birthday that month).
Here's a brief tutorial on how I built the spinning wheel.
HOW-TO MAKE A SPINNING WHEEL
- Foam Board
- Cardstock Paper
- Cardboard
- Dowel Rod (small piece)
- Thumb Tack
- Hot Glue & Stick Glue
My goal was to make a Wheel of Fortune type wheel that would spin and come to a stop naturally.
Step One: Preparing Your Pieces
Cut a large circle out of the foam board for the base of the wheel.
Create the cover that will lay over the foam board wheel. I made triangles in alternating colors.
Cut several smaller squares to act as filler between the wheel and the cardboard background.
For the background, I used one pre-cut sheet of the cardboard. (That's how it comes in our book order boxes😄)
The foam board and cardboard filler pieces all got holes cut into the center of them. The hole was just wide enough for the dowel rod to fit through them and allow them to spin.
Step Two: Assembly
Decide where you want your wheel to sit on your background. Trace around it and find the center. It's important that you find center to have that stability as it spins.
Once you find center, build up height with those filler pieces.
Use hot glue to secure these filler pieces.
Dowel rod will need to be glued into center of the filler pieces. Be sure it extends out enough for the spinning wheel to sit on it. (My dowel rod was < 1.5 inches)
It's hard to see in this picture, but I also added a filler square to the spinning wheel. This is so both touching spinning components are cardboard.
This is also hot glued together.
At this point, you should have your background piece built up around the dowel rod keeping it in place and a support filler attached to the spinning wheel.
Set the wheel over-top the background piece with the dowel rod coming through.
Make sure the dowel rod lays flush with the top of the wheel.
Step Three: Make it SPIN
To make it spin, I hammered a thumb tack into the center of the dowel rod.
As an extra level of precaution, once the hole was made by the tack, I removed it, added a dot of hot glue to the rod and put the tack back.
This connects the tack to the background piece while leaving the spinning wheel free floating and allowing it to spin.
Attach the decorative cover to the front and you're done!
Also check out....
💚💛💜


No comments:
Post a Comment