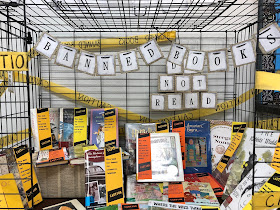
Banned Books Week 2018


Inspiration for this idea came from a picture off Pinterest of library books in a cage. The librarian who had done it had huge metal chains and locks around the cage, like the one you can buy from a Halloween store. (If I can ever find the original image I'll post it here!) The idea was absolutely adorable so I had to recreate it at my library!
Instead of a cage, I used an Extra Large dog crate.

We made CAUTION/ BANNED BOOKS tape with yellow crepe streamer and the words written over it. This is taped around the cage in no rhyme or reason.

For the banners, we printed off the letters onto cardstock and taped them onto pages torn out from a discarded book. The edges of the cardstock was aged with a stamp pad. These were hung to use up the dead space up at the top of the crate.

We also wrapped a spare box in these pages too to set books on top of. Just to add a bit of dimension.

Each book had a disclaimer attached to its jacket giving the reason why it was either banned or challenged.

Here's a link to the PDF of the book jacket covers!

We had lots of positive feedback on this display. And a good bit of people asking why these books were in a cage.

If you have access to a dog crate or any type of cage, this is definitely an attention grabbing display!

 Thanks to this big lug for giving up his crate for the week!

πŸ’šπŸ’›πŸ’œ

& YA book display

And & And & And & And...


Our Book List:
Anna and the French Kiss by Stephanie Perkins
Crash and Burn by Michael Hassan
Emmy and Oliver by Robin Benway
Egg and Spoon by Gregory Maguire
Eleanor and Park by Rainbow Rowell
Etiquette and Espionage by Gail Carriger
Me and Earl and the Dying Girl by Jesse Andrews
Me, Him, Them and It by Caela Carter 
Nick and Norah's Infinite Playlist by Rachel Cohn and David Levithan 
The Prince and the Dressmaker by Jen Wang 
The Ring and The Crown by Melissa De La Cruz
The Sleeper and The Spindle by Neil Gaiman
The Steep and Thorny Way by Cat Winters
The Wicked and The Just by J. Anderson Coats
What I Saw and How I Lied by Judy Blundell


πŸ’šπŸ’›πŸ’œ


DIY Journals

DIY Journals @ the library


Supplies Needed:
  •  Journal Pages
  • Cover and Back of Journal (cardboard pieces)
  • Construction paper
  • Hot glue gun
  • Rubber Cement
  • Duct Tape
  • Decorating Supplies
  • Binder Clips (not required but helpful)

    Journal Pages
    The goal for this journal was to be very interactive and non-standard. This meant creating many different pages that included writing prompts, coloring pages and general journaling prompts. These sheets were designed beforehand using Microsoft Publisher and printed off. These were made with  pictures pulled from google images and most of the fonts are from Fontmeme.com

    DIY JOURNAL PAGES
    How to make your journal

    1. Choose your journal pages and put them in any order you want.

      2. Choose 2 sheets of construction paper and fold in half  (the fold will be towards the spine of the journal).  Hot glue pages together. The paper clips help keep all the pages pressed together tightly while the glue dries. 


      3. While your pages are drying, decorate the Cover and Back of your journal. 


      4. Once the pages are dry and the cover/back are complete, align the spine evenly. Use Duct Tape to tape the book cover to the pages. 


      5. Use the Rubber Cement glue to attach the construction paper to the cover and the back. This also helps to reinforce everything... you know, so the whole journal isn't just being held together with duct tape...


      And that's it!


      This was done as a come and go craft one afternoon after school with school aged kids and it went fairly well! 

      If I could go back and do this differently, it would have been alot easier to have done this craft as a group, with everyone on the same step at any given time. 


                               πŸ’šπŸ’›πŸ’œ 

      Boys Vs. Girls SRP Bulletin Board

      For a little extra challenge this summer, our bulletin board was an interactive competition between boys and girls. 

      Every time a reading log was turned in, participants came to the desk and placed a sticker on the current weeks section. 

      Here the how...
      The lined paper was made on poster board. This year, our program was 7 weeks long so there were seven lines. 

      Each lined section had a duplicate blank piece of poster board cut out just smaller than it's section.

      Can you see the duplicate sheet in this picture?

      Each week, we'd have the duplicate, blank pieces sitting on the desk, attached to clipboards. 

      Each gender had their own clipboard so they knew which piece to put a sticker on. At the end of the week, I'd attach the newly stickered piece to the main lined poster board posted on the bulletin board. 

      Because I failed to get a picture of the bulletin board in its entirety, this was to the far left. 

      My thought was to keep track of how many books were read each week and update thermometer to reflect that. 

      That was a stupid idea. It was a pain and too much effort during the midst of all the summer craziness. After the first couple weeks, I started randomly raising the level just to show that we were still reading. No accurate groundwork or counting. 😬 It's not my proudest moment. 

      You can see part of the thermometer in this one! 


      πŸ’šπŸ’›πŸ’œ

      Jurassic World/ Marlin 1895SBL

      I sleep better at night knowing there is an affordable option to protect myself and my family against the dinosaurs released at Lockwood Estate. Thank you Marlin Firearms for making the world a safer place, one T-Rex at a time.


      πŸ’šπŸ’›πŸ’œ 

      I Survived The Joplin Tornado, 2011


      For our fourth "I Survived" book club meeting we talked about the Joplin Tornado. This program was broken down into 3 parts: Book discussion, snacks and an activity.

       Discussion 
       Of all the discussions we've had this was the most involved. Our library isn't located in Tornado Alley, but tornadoes aren't all that uncommon where we live so most of the group were familiar with these storms.

      As always, at the beginning of our discussion we each picked a favorite part of the book and shared it with the group. Other topics points we hit were how tornadoes form, their features, the destruction
      they cause and tornado safety. Aside from general tornadoes, of course we talked about the Joplin tornado.

      One of the grandmothers in our group even had a boss who had grown up in Joplin and she shared a bit of his family's experience!

      If you remember from the story, Dex's parents were at a graduation for the local high school students when the tornado hit. The graduation wasn't held at the high school but instead at the Leggett and Platt arena on Missouri Southern State University campus and was actually used as an emergency shelter in real life. For some reason, the minor fact involving Dex's parents to have foundations in truth caught my attention. From Graduation to Terror and JHS Class of 2011 Reflects On Graduation, Future were two memorable articles I read.

      Emergency Kit Relay Activity
      Instead of a craft (and because the only good themed craft I could find was Tornado in a Bottle, which I did NOT want to do) we played a relay game!

      Emergency Kits are so important to have and in this game, teams are building their own kits to prepare themselves against future disasters in a relay style game.

      During our discussion we made sure to talk about Emergency Kits briefly! 

      Cards with images representing various items were printed off and spread across a table face up. Most of the items were very useful to a traumatic event and some of them weren't.

      HOW TO PLAY
      Divide into 2 or 3 teams - we did Boys vs Girls with about 7 on each team.
      The way our room was set up was we had a table on one end where all the Item Cards were spread out face up and players stood at the other end of the room.
      Each team had to stand single file behind a chair which marked as their boundary limit. No one could go past that chair until a member of their team had returned with an Item Card. Teams placed their Item Card on the seat of the chair once they came back. 

      This continued on relay-style until all the Item Cards were chosen. 

      Each item had been given a point value so to choose the winning team, groups tallied up their score while I gave each point value out loud. 

      Here's a link to the Item Cards and the Point Value Sheet I made. Feel free to use them! The pictures for the Item Cards are straight off Google Images so one or two have watermarks... 😣

      Graph Map Activity
       This is an activity that we didn't have time to do but I'll share it with you anyway! This activity is about reaching safety using an X,Y grid and directions.
      In the Lauren Tarshis's books, having a sense of direction is very crucial to survival. In I Survived: The Joplin Tornado, Dex has to find his way from Peter's Garage to his home. That would be HARD when all the landmarks you've ever known were gone. 

      One of the themes of this series is getting away from danger and in an emergency, we might have to rely on how to read a map to get us out of a dangerous situation. 
      This Graph Map Activity was inspired by the Disaster Route Lesson on  Stem Read which is a very handy little website. 
      In this activity we would discuss cardinal direction, compass rose and use directions to travel across an X,Y grid to safety.

      To tie it into the Joplin Tornado, I was able to superimpose an X,Y grid with this picture of the Joplin Tornado's path of destruction.

      Because this map had schools distinctively marked on the map, those were able to be transferred onto our Map Activity Sheet.

      My goal was, using the graph map to travel from one of the schools in the tornado's path to the safe school. The thought was we could do one as a group and then form teams of two and each person could take turns giving each other directions.

      ***

      Well, that's all I have to share about this Book Club meeting. Overall, it was my favorite and your group will LOVE the Emergency Kit Relay Game if you do it!

      πŸ’šπŸ’›πŸ’œ 

      Wizard of Oz Bulletin Board

      Where troubles melt like lemon drops, away above
      the chimney tops that where's you'll
      find me...

       One thing I LOVE to do with my bulletin boards is to get scrapbook paper from Hobby Lobby and print my letters off onto it. This gives them just a little bit of texture.

      My letters are typed up using Microsoft Publisher and are anywhere from 4.5 to 7 inches tall.

      By arranging them in Publisher ahead of time, I know exactly how many pieces of paper I need from Hobby Lobby too, which makes the trip infinitely easier.

      This is what my pages usually look like in Publisher.

      If you twist the letters around to fit any which-a-way on the sheet you can fit more letters per page. However, if you do this be sure to look for a scrapbook paper where direction doesn't matter in the pattern.

                  πŸ’šπŸ’›πŸ’œ

      I Survived: The San Francisco Earthquake, 1906

      I Survived: The San Francisco Earthquake, 1906 by Lauren Tarshis

      For our third "I Survived" book club meeting we talked about the San Francisco Earthquake. This program was broken down into 3 parts: book discussion, snack and activity.


      Discussion 
       If I'm being perfectly honest, this was not my favorite "I Survived" book and I'm afraid that might have played a part in our discussion. This book just didn't capture me like Thomas's heroism in I Survived: The Battle of Gettysburg or Ben's journey of survival in I Survived: The Japanese Tsunami. But this isn't a book review so I'll keep my opinions to myself πŸ˜‰
      After discussing our favorite parts and asking questions about the book, we covered a couple different talking points.  These included the science behind an earthquake and impacts of the San Francisco earthquake and what made this event so unique. 

      This group actually found the resulting fire that broke out in the city very interesting - especially the part where several buildings were blown up with dynamite in attempts to stall the fires. I even read that people in towns 50 miles away said the fire gave off so much light, they could read a newspaper at midnight.
      Snack
      Themed snacks were a little harder to come up with for this book club meeting than the others had been, but we managed. /div>

      Cookies (extras from a previous program), Sour Dough bread and Hershey's Chocolate Bars. 

      During my (mostly fruitless) search for snacks specific to either the 1910's or San Francisco, I found a story about San Francisco becoming famous for Sour Dough bread  during the gold rush. Miner's would buy a loaf of bread in the morning and eat it throughout the day. In particular, there was one family that came from France and has used the same sour dough starter since 1849 and legend has it that during the 1906 Earthquake, one of the family members was able to save a bucket of the mother dough! Here's the article link for more info...

      Then the Hershey's chocolate bars were just wrapped in card stock with news headlines printed on them. 

      Marshmallow Structure Activity
      For our activity, we attempted to recreate the effects of an earthquake on homes. We built structures using marshmallows and toothpicks and then tested the durability of our structures by shaking them.

      This activity came from this Teachers Are Terrific link. We used the shake tray with the foam board suspended by elastic.

      The group LOVED this activity but these structures took a while to build. They were given 10 minutes to build and then we would shake together. But when it would be 2 minutes til time to shake, someone's building would collapse and they'd need more time to build, so we'd give the group an extra 5 minutes and then another persons would fall and so on and so on.... 

      Eventually we did shake our building and most of them actually survived our earthquake simulator! 
       ****

      All in all, it was a great book club meeting. Can't say I would have done anything different! Happy planning in your own Book Club endeavors!


      πŸ’šπŸ’›πŸ’œ

      Teen New Years Passive Program

      One year, just because I was curious, I ran a report to see what the most popular book titles in the YA area of the library was. 
      And for the past few years, we've been posting those results to share with our patrons!


      In the past, we've done different categories like, Top 10 series. In that instance, books in a series were put on a separate list from stand-alone titles. 

       This was because that one particular year there were all 3 Divergent books on the list and quite a few Harry Potters. There wasn't enough space to see what the good stand-alone titles were.


       and 

      To make it a Passive Program, we just ask patrons what they've read from this list and provide notecards to write down their responses.

      I WISH I'D HAVE SNAPPED A PICTURE BEFORE TAKING IT OFF THE BULLETIN BOARD😭😭😭


      A super simple list that is fun to collect and even easier to post! Plus it's never a bad thing to know what your teens are reading.


      πŸ’šπŸ’›πŸ’œ

      Winter Olympics Bulletin Board

      Ever design an interactive Bulletin Board and then later say, WHAT WAS I THINKING?!
       
      That was this bulletin board. 


      For the Pyeonchang Winter Olympics, I wanted a Bulletin Board that reflected the festivities and excitement of the various sports. 

      For this board, each winter sport was represented and my thought process was that as each country placed in a specific sport, it would get a medal. 

      It would be updated frequently and anyone who came into the library could see at a glance, "Oh look how many medals the Netherlands have in Speed Skating!

      Who knew there were so many medals given out!!

      BULLETIN BOARD UP KEEP

      At least once a week the board was updated to reflect current medals. 

      This included continuously printing off flags for various countries and cutting out medals. A LOT of medals. 

      This board required a good bit of maintenance - definitely something that wouldn't have been possible in the summer.  

      OLYMPIC PASSIVE PROGRAM

      As a passive program, we had library patrons vote on what their favorite Olympic sport was out of 8 options. This was done by putting a sticker by that sport.

      You can see this program in the bottom left of these pictures!


      πŸ’šπŸ’›πŸ’œ

      I Survived: The Japanese Tsunami, 2011

      I Survived: The Japanese Tsunami, 2011 by Lauren Tarshis 

      For our second "I Survived" book club meeting we talked about the Japanese Tsunamis. This program was broken up into 3 parts: Book Discussion, Snack and Activity.


      Discussion
      Everything about this book was interesting and there was SO MUCH to talk about! Everyone in the group had read the book, so we started talking about our favorite parts of the book right away. 

      We actually covered alot of talking points in our discussion. This included talking about how a tsunami happens, Japanese history of tsunami's, tsunami's in America and the factors that made this event so unique (earthquake, tsunami and Fukushima).

      One thing the kids found particularly neat was the "Sai-Shou-Maru", a fishermans boat that was cast out to sea and traveled over 4000 miles to Long Beach, Washington!  Here's the link to one of the articles.   The library has a great globe that we looked at to find Japan and Washington state to better visualize the distance the boat traveled. 

      Snack Time :) 

      It only seemed fitting to have Japanese snacks! Fortune Cookies, Pocky sticks (which are just like chocolate covered biscuit sticks), seaweed, green tea and coconut water. 

      I even brought my Hello Kitty coffee pot in to make the hot water for our green tea πŸ˜„ 

      Another option for snacks was candy sushi, which is made with fruit roll up and other gummy candies. If we hadn't of planned a messy and more time-intensive activity we might have done that, instead. 

       Tsunami + Lego Re-enactment

      For our activity we attempted to recreate a tsunami based on this Youtube Tutorial. I purchased 3 large rectangle bins from Target to use since we had none on hand.
      One bin I even bought for myself to use at the library and then take home - these bins are nice for putting fabric in! 

      Set Up: The video does a very good job of going through how to set up this plastic bin for your tsunami. We did have a couple minor changes to ours. These changes were things such as, instead of using blocks of wood and gluing the plywood to the blocks to make our platform for the beach, we just set our platform on top on small plastic boxes filled with rocks - our blocks off wood kept floating up.

      One thing I wasn't too fond of concerning ours was that our bins seemed to be just a little too short to get a good wave in.

      For the activity itself, kids were split up into groups of 3 or 4 and given 10-15 minutes to build a Lego City to destroy. Once all the cities had been built we added water and made tsunami's using the plywood and string to create the wave.

      Unfortunately, the Lego's we used must have been too strong because none of our cities were too badly damaged by the storm. 😝  Finding an alternative to use other than Lego's might be something to consider if you're wanting your city to fall. But how was I to know it wouldn't work?!

      Overall, fun book, interesting discussion, Lego activity and unique snacks. Two thumbs up! πŸ‘πŸ‘

      Forgot to Mention....

      World's worst picture, I know.. 

      To help visualize how tall the waves were compared to us, we had this little activity. The writing on the board say, "On some parts of the Japanese coast, the waves reached 100 feet high! That's nearly 25  time taller than you." 

      The question posed to the group was, how tall would the wave have been compared to the Lego Mini figure .... see him down at the bottom? 

      We took turns making marks on the board where we thought the top of the wave would be. Several of the kids thought that the wave would have actually been taller than what the dry erase board was, so they got stickers to stick on the wall. The star is how tall the wave would have actually been compared to the Lego Man. 


      πŸ’šπŸ’›πŸ’œ