Rapunzel's Lantern tutorial


Rapunzel's glowing lanterns were inspired by this clever craft idea for a fall leaf lantern, I stumbled across a few weeks ago. This was such a cute idea, I had to try it and it was easily adapted to fit in with the movie Tangled.

My lanterns were based on the same instructions only with shredded purple and yellow tissue paper instead of leaves, to reflect Corona's flag color combination. Also, instead of round cheese containers, Pringles cans cut to size will do just fine.

 Supplies used were: Tissue paper, golden suns cut on construction paper, a glue/water mixture, tea lights, Pringles cans, wax paper and paintbrushes.

Using a medium sized piece of wax paper, we folded them in half and covered one half with glue, tissue paper and the golden sun emblem. Then we added more glue over top and folded along the crease. 

From here, we let our lanterns dry and set down to watch the movie. This worked out well for kids who came in late too! They just made their lanterns up to this point and left them on the table.

When they've stiffened up and dried a bit, it's easier to  fit them into their tops and bottoms. This part required the most amount of setup as the Pringles cans were cut to be about an inch tall.

The tops and bottoms were wrapped in colorful scrapbook paper and ready for wax paper!

To fit the wax paper into the top was simple enough - I just used a stapler. For the bottoms we pulled out the hot glue gun and glued the edges of the wax paper to the sides of the can bottom. Tape and Elmer's glue just wouldn't cut it for the bottom. (Ignore the crumbs in my test lantern!)

Once these two parts are secured to your lantern, the tea light sets in the bottom and voila - Rapunzel's glowing lantern. We used LED tea lights from Hobby Lobby, which came in a box of 16 for $10 regular price.

One thing I had not considered until a little girl came up and asked was string to hold them. She creatively fashioned her own handle out of her popcorn bag, which I thought was very resourceful.
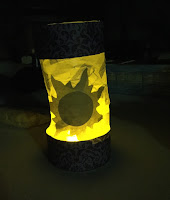
Overall, this craft was very well received I thought. The main age group of our attendees were early elementary with a few of our Storytime kids.

And the picture looks lame - it was taken with my dinky phone but this is an idea of what it looked like with the lights off.


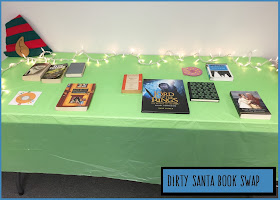
Dirty Santa Book Swap


Last year our TAG group came up with a great idea for a Dirty Santa Book Swap program for December. This year we did it again.

  This program is incredibly low maintenance and that may be why it's one of my favorites.We ask that teens bring in one of their own beloved books from home to exchange for something new to read. Some kids choose to bring mix CDs as well as books and that's totally fine! Alot of teens even bring several books to give away - not just one.

The game is usually very quick and we just go around the room until all the books are gone.

This year, the teen program followed one of our kids program where we showed a movie and made crafts from Popsicle sticks, so the leftover craft supplies were brought over from that program.

No idea why this is sideways....

The teens at our library LOVE glitter and sequins, so anytime those can be incorporated into a craft is usually a huge plus imo.

But I can't forget to mention the big hit of the program, which was the Hot Chocolate Bar!

Amazon offers a set of seven different flavors which was bought, which included Smores, Pumpkin Spice, Chocolate Supreme, Caramel, Raspberry, Arctic White and French Vanilla. In this package there were 6 packages of each flavor so we were set. Walmart also had various flavors available such as Mint and chocolate, Cinnamon and chocolate, Butterscotch and chocolate, etc. Who knew there were SO MANY different hot chocolate flavors out there??


I opted to try the Arctic White first which surprisingly was very bland and disappointing. French Vanilla was the crowd favorite and only one girl was brave enough to try raspberry.

Because our community room where we have our programs does not have access to a sink (those are in the bathrooms and staff area downstairs) we needed a way to have hot water. Cue coffee pot. It took a little more effort than if we had had access to a microwave, but this worked out fine. It just had to have water added to it regularly since it's not a full-sized coffee pot.

Buying the hot cocoa and marshmallows was literally the only expense for this program. Next year, if we choose to do this again, I may run to the local thrift store or the book sale room and try to purchase a couple good book titles and fluff up the table though. Not that we didn't have some great titles, I think people are just hesitant to bring books they really enjoy to give away.


Holiday Passive Programs

 To add a little more interactive fun to our Christmas decorations in the Children's Department this year, we've incorporated 2 super awesome winter passive programs (and maybe one more to come!).

Thanks to the ladies over at School Library Displays  for sharing the idea! Most of the books under our tree are easy readers but there are a few chapter books in a mix of new books, old books and undiscovered gems. 
And because I'm a slightly paranoid person, a key sheet that matches the title to a number written on the butcher paper. In case someone comes in looking for Llama Llama, Red Pajama I can consult my handy reference sheet  and tell them to look for #x instead of going, "Yea, it's one of those wrapped books under the tree". You feel me?

 These rules were heavily plagiarized from the link listed above! 
To go along with unwrapping a surprised book, we also have book reviews inside the cover of each book. Children can fill these out and return to staff before a certain date for an entry into a prize drawing!
Gah, ignore the typo in #4...

The second activity is less involved...


Taking down my Where The Wild Things Are was a toughie. I even left it up for nearly 3 months, which is double the amount of time they usually stay up!  

Anyway,  I LOVE interactive bulletin boards so I can't tell you how excited I was to have this new bulletin board to replace Wild Things with! For this, the snowflakes ask "What are you reading?" and kids can decorate a snowflake to go on the board. There's a box of crayons and scissors available so kids can cut out their snowflake (or have mom do it). 

Kids can put the finished snowflake in a box or give it to one of us in children's and we'll get it up there. We're using sticky tack instead of a stapler too, so if little  kids want to put their own snowflake on the board, that makes it a lot easier than giving them my stapler!


I love seeing all the colorful snowflakes that kids are making and can't wait til we get more up there!

Neville Longbottom in the Sorcerer's Stone


Neville Longbottom in the Sorcerer's Stone


One of my bigger pet peeves of the series is the movie portrayal of Neville is not given enough recognition, being shoved more towards the wayside whereas in the books, he plays a decent role as a tag-a-long friend to the trio. His characters history and the progression from a nervous clutz to brave leader is severely under-represented. 

 In Sorcerer's Stone Neville Longbottom is introduced as a forgetful student and readers are immediately given an impression of how isolated and withdrawn he is (for lack of a better word). When he sticks his head into Harry and Ron's compartment on the train and asks if they've seen his toad, they respond with a negative. He leaves and Ron immediately shares with Harry, "Don't know why he's so bothered...If I'd brought a toad I'd lose it as quick as I could. Mind you, I brought Scabbers, so I can't talk" (SS 104). This comes right after Harry's trip with Hagrid to Diagon Alley where Hagrid informs him that "toads went outta fashion years ago, yeh'd be laughed at" (81).  

But imagine how lonely and hard Neville's childhood had to be. Having been raised by his Gran and then faced with the possibility of being a squib, I can't imagine he was accepted by his peers pre-Hogwarts. His toad is a testament to how unfashionable he is and sets the story for him to be that severely un-cool kid in the back of the classroom everyone looks down on. Even his Gran seems to constantly be expecting him to be better. 

 'Gran, I've lost my toad again' 'Oh, Neville,' he heard the old woman sigh. 

However, despite Neville's clumsy character in SS, one of my proudest moments of him - yes, ignoring the later acts of bravery in DH-- is during the Hufflepuff/ Gryffindor Quidditch match. This comes just after Neville has been in put in a leg-locker curse by Malfoy who "said he'd been looking for someone to practice that on" and of course, Neville is the perfect target to be bullied. 

Go to Professor McGonagall!" Hermione urged Neville. "Report him!"
Neville shook his head.
"I don't want more trouble," he mumbled.
"You've got to stand up to him, Neville!" said Ron. "He's used to walking all over people, but that's no reason to lie down in front of him and make it easier."
"There's no need to tell me that I'm not brave enough to be in Gryffindor, Malfoy's already done that," Neville choked out.

First, I must express what an enormous BRAT Malfoy is in the book! He's the spitting image of his father in every way and a complete bully. He takes Neville's remembrall, attempts to get Harry in trouble under the pretense of a wizards duel after hours, he's just a jerk. 

During the Hufflepuff/ Gryffindor match Malfoy is again, badmouthing Potter, Weasley and then mentions how Longbottom has no brains. Which is why, when Neville turns in his seat to Malfoy during the match and stammers "I'm worth twelve of you, Malfoy" is such a notable moment (223). Even here, we see the potential and honor Neville has within him. And it comes at a point when Malfoy is insulting not only him, but his friends too, which goes to show his loyalty. 

Not only does he say this to Malfoy, although he is clearly intimidated by the situation, but when Ron snaps and wrestled Malfoy to the ground, Neville has his back. He initially hesitates and then quickly clambers over his seat to take on both Crabbe and Goyle! Is no one else impressed by pudgy Neville tackling on two big Slytherin's? 


Cinderella Program


I remember when I was barely 13 and discovered Quizilla. Back then it was just a website for quizzes which gradually began to incorporate fanfiction and nowadays, I'm not sure what it looks like. But I do remember that was my first experience with creating quizzes of any kind.

For our Cinderella movie night, I was able to revisit those days of quiz-making as I crafted a version of What Cinderella Character Are You?
I'd forgotten how much fun it was just to make silly quizzes :)

Once you took the quiz you went around to the back of the easel where the answers were posted. 1= Fairy godmother, 2= Stepmother, 3= Prince, 4= Mouse, 5= Cinderella, 6= Stepsister.

A couple ladies from another department went all out and made a background and stand up carriage for photo-ops!  They had a huge assortment of dress up clothes to pose with as well. Hats, scarves, crowns, fabric- it was very impressive.

Aside from showing the movie, little crafts and snacks were set out. We decorated crowns, made wands out of pretzels and melted chocolate, had coloring and trivia sheets, etc. And because this was planned right after Halloween, we were able to find alot of those candy corn pumpkins on clearance for snacks.

Surprisingly though, the movie didn't seem to hold attention like other kids movies we've shown. Maybe because it's more grown-up version of Cinderella when compared to the animated, so the kids were a bit more restless than in times past.

It's an adorable adaption of Cinderella though and the costumes are fantastic!

Monsters Afterschool

One program that was passed onto me recently was Story crafternoon, which has recently been re-branded as Makerspace. It is typically for school aged kids but at libraries, sometimes you never know who will show up! We've had anywhere from 4 year old to 6th graders come to these programs (and it can be rough when these extremes show up on the same day). This has been an assortment of activities from balloon rockets to minecraft mosaics to paper art. Sometimes there will be a story to go along with it, but if there's not, we really don't sweat it.

For this months story crafternoon we read Frank Was a Monster Who Wanted to Dance by Keith Graves. It's an incredibly short, cute story about Frank who wants to dance so he goes to the theater, where he dances on stage for an audience until his body parts start falling off. It has rhyming, fantastically vibrant pictures and it's just gross enough for this age to be intrigued.

After we talked about the book, we made monsters together on the wall. This a mixture between musical chairs and that game you used to play in highschool where you would pass a piece of paper between you and your bestfriend and you would each add something to the page.


 Anyway, blank monster shapes were stuck to the wall, and monster accessories (eyes, horns, noses, mouths, spikes, etc) were spread out over chairs. Music played (The Monster Mash and theme to Ghostbusters) and the kids walked around the chairs. When the music stopped, kids had to pick one thing off the chair they were standing closest to and stick it on a monster. One chair just had candy sitting on it but the kids were much more interested in adding to the monster and we played until we ran out of sticky tack.

Our craft inspiration came from this website. I had tried using a plastic paper plate for the example, which I wouldn't recommend with liquid glue. Paper plates worked best for the kids.

Overall, it seemed to go over well for very little planning.  I try planning programs that are a bit more generic than holiday oriented. Christmas and Halloween don't offend me, but I sure don't want to offend anyone else! So naturally Monsters seemed like a good balance between halloween and October as just another month. :)


Foam Sword Tutorial

 World of Warcraft Foam Sword Tutorial
Having never before made a costume sculpted from EVA foam before, I rely HEAVILY on tutorials from more talented crafters. For some reason, where to begin with this sword construction really stumped me. Here's how this project went down for me - hope it helps you!

Items used were: 1) interlinking foam mats, 2) thin color craft foam, 3) glue (both hot glue, contact cement and modge podge), 4) carpet knife, 5) small sander and dremel, 6) paper mache paste, 7) pipe, 8) spare fabric
______________________________________________________
To construct my sword, I started with printing out a picture of the sword in the desired size. Instead of free-hand drawing anything, all I did was cut apart my picture and use that as my pattern. This helped save time and hassle.

Once the base was cut out, I used the dremel to create a trail to fit my handle into.  To provide sturdiness to the sword, this copper pipe spanned nearly the entire length of the blade.

Once both inside pieces of the foam where sanded into with the dremel to allow room for the pipe, the pieces were glued together. I used hot glue since it's strong and sets quickly.

I was warned about using hot glue as it does pose the possibility of the wax remelting in the heat. This was not an issue with me in the southern summertime heat. 

 Adding the embellishments, took about a day. For Quel'delar's claw-like grips that hug the top of the blade, I brought out my paper mache.
These claws were originally shaped with thin craft foam then paper mache' d over them for strength and smoothness. I am continuously amazed by how sturdy paper mache can be. They were sanded smooth.
In fact, paper mache was also used around the copper pipe to keep it from moving since I had actually forgotten to secure it inside the sword. Oops.   

One of the things that stumped me while reading about how to make a foam sword was the discussions on priming and sealing.

Before painting, everyone seemed to endorse priming first, saying that because it is such an absorbent material, it will absorb any paint applied to it. So to prime it, I mixed equal parts Modge Podge and water and covered the sword with two layers of this mixture.  After those layers dried, I painted it.

I know it's not perfect, but not too shabby for my first attempt right?

Take pride in your work


With creative collaborative websites and online blogs, it's so easy for us DIY-ers to compare ourselves to every random Jane Doe we come across online. I LOVE scouring the interwebs, seeing what creative creations people can come up with. And should I even mention my Pinterest addiction?

For me personally, when it comes to my crafting, I am a complete perfectionist with the skill level of a grapefruit. So I spend more time critiquing my work than congratulating myself.

This coming Labor Day weekend, I will be wearing my (mostly-finished) World of Warcraft, Death Knight Tier 10 costume. This was the first mmorpg I ever played way back in bc, so when my husband and I watched the wow costume contest at Dragoncon last year, I couldn't help but think "why haven't I made one of these yet?" and decided to make a small goal for myself - I would forge my own armor set and participate in contest the next year. A goal and event (walking across the stage in  front of actual people) that is near inconceivable for me to carry out!

With remarkably inspirational Blizzard cosplayers and tutorials out there, I was encouraged to begin construction of my own.

Is it as well crafted as costumes like Kamui Cosplay? No! Of course not!

My glue seams show (you can even SEE the glue in some places), curves aren't consistent, the sanding is rough, pieces aren't attached evenly, my chestplate doesn't curve around my back and pokes out, I can find fault in ever piece of armor I spent the last 5 months constructing.

Why can't I just be proud of myself?

Instead of looking at the costume on my mannequin and seeing negatives, I want to instinctively be the person who sees the passion and time put into it. I compare myself to other people far too often, which makes me bitter, jealous and leaves me disappointed when I can't have or accomplish the things I see other people doing. It's not that I feel entitled or lazy, it's just that I set my standards too high. I look at something and see one persons skill level and I expect mine to be parallel with theirs, when they've been honing their craft for 10+ years.

So when I tried on my entire armor set last night and looked in the mirror, I wondered- does this display enough skill level to warrant entering a contest? There's nothing special about it at all. It's not based off a main character, it has no lighting or battery movement. It's just me wrapped in painted foam.

But then I remember, it's painted foam that's been littering my living room floor since January. There are scraps of foam under the couch cushions, globs of paint and paper mache stuck to the table I've been working on, faux fur balled up and tossed in a corner... my craft space is a complete mess. This has been my most expensive costume to date. I've spent half the costume budget on glue! This has been a 100% learning experience and I shouldn't compare myself to the professionals I follow online.

So when I read that we should take pride in our work, even if it's not the prettiest, I understand completely. My mom always told me growing up that as long as I did my best, that was all that mattered. As long as we put our best effort into our jobs and crafts, our love and passion for our work, crafts and selves will show.


Where The Wild Things Are bulletin board

When the summer reading decorations are taken down, the children's department looks so boring. The room goes from vibrant colors and exciting displays in every spare corner back to bare beige.

What better way to help this transition than a bright, book-inspired bulletin board?!


The characters were traced onto poster board and colored using oil pastels. Leaves are 3 different colors of green butcher paper -the lime green was re-purposed from the previous bulletin (hurray for re-purposing supplies!)

I started with the monster on the right and worked my way to the big guy. If I had begun with the big guy I probably would have made him smaller. He barely fits in the frame, but it worked out just fine. And of course, I forgot to save room for my letters, so imagination covers 2 lines.

Do you guys start putting up bulletins with your letters or images first? This isn't the first time I've forgotten to allow room for my words....


Harry Potter Birthday Party

πŸŽ‰HARRY POTTER Birthday Celebration πŸŽ‰

It's always a huge sign of relief when Summer Reading is over, the kiddies go back to school, you don't have to constantly print and fold reading logs and you can take the long needed breath. Summers are HARD in the Children's department!! But this year, we had a completely different reason to looking forward to the end of July...  HARRY POTTER CELEBRATION!! 

For this program we had multiple board games set out, snacks and a craft.  This was set up as a come and go event for the teens but most of those who came stayed for the entire length of the program, which was completely fine!

Board Games

If you've never played Harry Potter and the Sorcerer's Stone Trivia game, you should. It's one of my favorites. It was released in 2000, so a year before the movie which means the questions are based on the book - a great way to differentiate the readers from the non-readers πŸ˜‰

Another type of game we had was Choose Wisely - a form of bean boozled roulette, created by this user at Craftster.org.

If you're not familiar with Bean Boozled Jelly Beans, the gist of it is, there are two flavors of each color jelly bean in the box. So there would be two jelly beans that look identical but one would be buttered popcorn whereas the other is rotten egg. Or one is Berry Blue while the other is toothpaste. 


You will need: 
  • Bean Boozled Beans
  • Dice with 1,2,3 and ALL  written on all sides. If you use a 6 sided die, 2 numbers can be duplicated.
Rules explained in the picture πŸ”ΊπŸ”ΊπŸ”Ί


CRAFT: Picture Frames

This is probably one of my favorite crafts to do for teen events like this. It's easy to gather supplies for and really, all you have to do is find pictures online to print off!  This Website is a great place to find printable prop replicas like for books and labels and sort.

Here's a PDF to the images I gathered to print off... CLICK ME

We had sequins, markers, small hp iconic shapes printed on regular paper that could be cut out, glitter glue - a crowd favorite amongst these guys- and scrap paper to decorate with. All you do, is pick a picture to use, glue it on some cardboard backing and start decorating! (Of course, anything with sequins and glitter is usually going to result in a huge mess but I'll gladly spend a little extra time cleaning up if it makes the event a little extra special).

The cardboard backing is super easy for us to come by. They're just cardboard rectangles approximately 20x14 inches that come in packages with our book orders on occasion (If I'm remembering correctly). If we cut them in half then they're basically the PERFECT size for this craft.

Here's one picture I was able to snag before the program ended...And of course, this person just glued a huge piece of construction paper over their cardboard.

Overall, we had a good sized crowd of passionate Harry Potter fans and the group seemed to have  a great time!


πŸ’šπŸ’›πŸ’œ

Percy Jackson Scavenger Hunt

 Oh the perils of planning a program around a series I have not read.


While planning for Summer Reading, one theme TAG kept mentioning was Percy Jackson. Based on their book descriptions I think I loosely remember reading The Lightning Thief but that was the extent of my knowledge and unfortunately for this program, I couldn't get anymore input as to what they wanted to do with Percy Jackson.

So of course, I scoured Pinterest for any inkling of a direction to take this. Maybe it was my word searches, but I was not finding anything age appropriate to confidently offer my teens! Thankfully, where all else fails, Teen Librarian Toolbox (Olympians Week) pulled through for me.

The Scavenger Hunt: Teens helped to pick out the objects that would be hidden around the library, but since this was a scavenger hunt for them, they wanted to be surprised and play along.

Originally they had expressed an interest in all three of the twists the Teen Librarian Toolbox had to suggest, but in the end, it was just your average scavenger hunt. Well, as average as I know how to make them- this one being my first ever!

I attempted to incorporate Percy Jackson trivia and library building structures and objects to base my clues on. For example, on top of the YA display bookcase we have a huge plant so that clue read "It's not Thalia's pine tree but look for this plant. On top of this shelf lies something very useful to Percy" and of course, 5 little Riptides were waiting to be grabbed.

These objects were nothing elaborate either. Riptide was thin foam covered in blue duct tape with a picture of the actual Riptide taped on and the trident was a blue plastic fork. The camp flags were felt and the report cards were printed off versions I found online.

At the start of the hunt, individuals were grouped into teams and given a scavenger hunt clue sheet and brown paper bag. In preparation, I had made various objects from the books that teams would have to collect to put into their bag. Each team would take 1 item and leave the rest for the other teams to find. As well as the hidden objects, there were the golden coins placed sporadically around the library that acted as extra points. Some of the things on the clue sheet were trivia questions though, just to add some variety and that was one thing the teens said they would have liked to have seen more of.

They were given 35-40 minutes to complete the hunt and had to be back in the Community Room at the designated time. Upon their return we had snacks and tallied up their points! Surprisingly, none of the teams found all the items... but whether that was because of my terrible clues or time.... well, let's face it- it was probably me. Read my clues and you'll see what I mean!

This was a program that went over very well though. Kudos for Teen Librarian Toolkit for having it available.

And here's what the clue sheet (my cheat sheet) looked like for all you people out there who may be stumped on this like I was!

Frozen Bulletin Board


In the freezing, arctic-like winter weather, Olaf's excited cry "Let's go bring back summer!" seemed like the perfect fit for our winter bulletin board! Plus, I saw a pin on pinterest of a teachers door...

                                                     
 I mean, how cute is that???

Adapted for an 8 ft bulletin board... The castle was traced onto white poster board and covered with tissue paper for color. Other than that, I just used the cricut to cut out the snowflakes and letters.